1. Home
  2. Knowledge Base
  3. BuddyBoss Platform Docs
  4. Done For You Web Service
  5. How to Set Up Cloudways Account and Authorize Credit Card Billing

How to Set Up Cloudways Account and Authorize Credit Card Billing

How to Set Up a Cloudways Account and Authorize Credit Card Billing

Introduction
This guide walks you through creating a Cloudways account and authorizing your credit card for billing. By completing these steps, you’ll be signed up for the basic package and automatically billed for the default 4GB package within three days. 

Once your account and billing are active, you can proceed to our tutorial on setting up the Cloudways hosting package.

Access Cloudways

  1. Open your web browser and go to Cloudways.
  2. Click the START FREE button.
Screenshot of the Cloudways website homepage, highlighting “Managed Web Hosting built with Control” and buttons to try or view plans; includes a navigation menu and a login/start free button.
#image_title

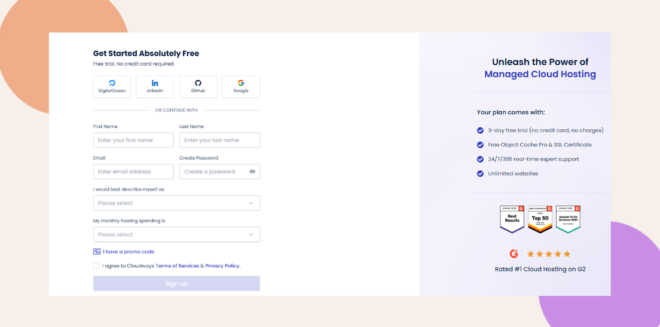
Complete the Signup Form

  1. Fill in your signup details (name, email, and password).
  2. Click TRY NOW FREE to create your account.
A website sign-up page for cloud hosting, showing form fields for name, email, password, monthly website visits, and sign-up options. The right side lists plan benefits and displays service badges and a “Sign up” button.
#image_title

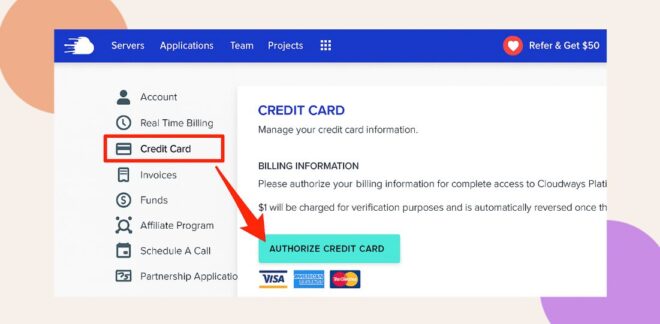
Add and Authorize Your Credit Card

  1. In the top navigation bar, click the + icon (next to the search field).
A website dashboard shows server provider options and an arrow pointing to the “Account” button in a dropdown menu beneath a user profile icon. Provider logos include DigitalOcean, VULTR, Linode, AWS, and Google Cloud Platform.
#image_title
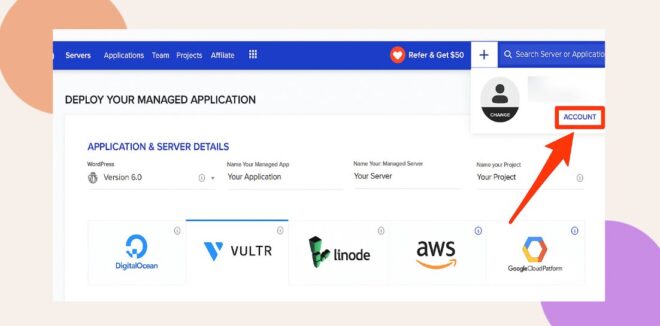
  1. From the left-hand menu, select Credit Card.
  2. Click AUTHORIZE CREDIT CARD.
A website interface shows the Credit Card menu selected. An arrow points to an AUTHORIZE CREDIT CARD button below billing information, with Visa, MasterCard, and American Express logos visible underneath.

Note: Authorizing your credit card signs you up for the basic package, and you’ll be billed for the default 4GB package within three days.

Finalize Your Setup

Once your credit card is authorized, proceed to our tutorial:
 

Troubleshooting and FAQs

Q: What if I don’t see the + icon in the header?
A: Make sure you are logged into your Cloudways account. If the icon is still missing, refresh your browser or clear your cache.

Q: How can I confirm that my credit card has been successfully authorized?
A: Look for the on-screen confirmation message and check your email for verification from Cloudways.

Was this article helpful?

Related Articles

Subscribe to Our Newsletter

Stay In Touch

Subscribe to our Newsletter, and we’ll send you the latest news from BuddyBoss

  • This field is hidden when viewing the form
  • This field is for validation purposes and should be left unchanged.